Windows 10 is doing exceptionally well in every area. It is magnificent while working on various applications. Windows 10 is also the notch choice of gamers as it allows them to feel the zest of the game completely. The strong OS Windows 10 provides the required configuration and speed to suppose all the popular and heavy games. Here in this article, we will share with you certain ways by which you can optimize your Windows 10 for gaming and higher performance.
Optimize Windows 10 With Gaming Mode
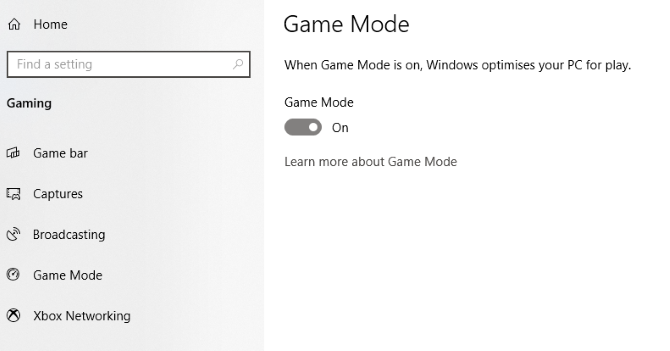
Windows 10 has gone through several updates, and each update brings something new. The latest release of Windows 10 was a gift for the gamers as it brought gaming mode optimization. To optimize Windows 10 with gaming mode, follow the below steps:
- Initially, after turning your System on, you have to press Windows key + I
- This will redirect you to the Settings panel of your System. There in the search bar type game mode
- Out of two options, Click Game Mode settings or Turn on Game Mode; you have to click anyone.
- A screen will appear in front of you with the name ‘game mode.’
- You have to switch the button of game mode to on from off to optimize it.
- And here your PC is ready to function your gaming mode.
Disable Nagle’s Algorithm to Enhance Gaming
Nagle algorithm might be the friend of your System, but it is an enemy of gaming in PC. While Nagle’s algorithm is enabled in your PC, it is going to temper your gaming speed. So it will be better if you turn off Nagle’s algorithm settings of your PC. to disable it follow the below steps:
- Press Windows key + X
- Out of all the other options you have to select Windows Power Shell
- After that, on the appeared screen you have to Enter ipconfig
- Then search for for “IPv4 address” to know your PC’s IP address
Once you know your IP address, edit the Windows Registry:
- To register first Click Start
- Then search by Typing Regedit
- Further, Select Registry Editor
- Once the registry editor is opened, you have to copy and paste the following path in the address bar:
HKEY_LOCAL_MACHINE\SYSTEM\CurrentControlSet\Services\Tcpip\Parameters\Interfaces
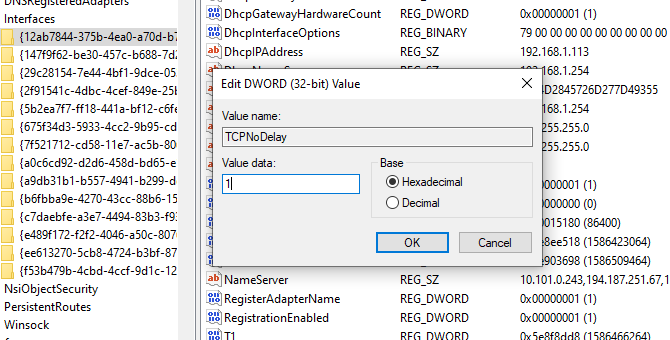
- After this step, you will find a list of folders in the left-hand pane. Every folder will have file names mixed up of letters and numbers. You have to match your IP address with t DhcpIPAddress to locate the correct file. After that follow the below steps;
- Right-click on the folder
- Then Select New > DWORD (32-bit) Value
- You have to Name this as TcpAckFrequency
- Then click on the OK button.
- After that Select New > DWORD (32-bit) Value again
- Again Name this one TCPNoDelay.
- Double-click on each and set their parameters to 1
Complete these steps and you are done disabling Nagle’s Algorithm.
Make Online Gaming improved With Faster DNS.
Optimizing Windows 10 online gaming with faster DNS will improve your online gaming experience. It avoids network traffic as it contains faster internet. To make your online gaming fun follow the below steps;
- Once you have turned your system on, you have to press Windows + I which will redirect you to the Settings page.
- On the settings page you have to look for Network and Internet > Change Adapter Settings.
- Then Right-click on your wireless network
- Further, you have to Select Properties
- And then Highlight Internet Protocol Version 4.
- Later on, you have to make a note of the two DNS entries
- Then replace them with 1.1.1.1 and 1.0.0.1.
- After you are done with this press OK and restart your default browser.
After you finish the last step, your online gaming is going to be super fast and fun.
Turn off automatic updates.
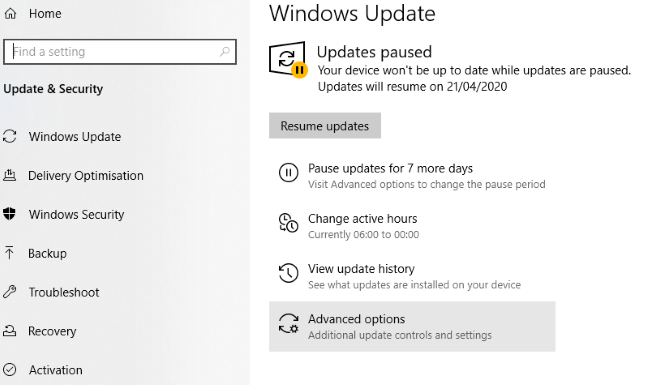
As mentioned above, Windows 10 keeps renewing itself by several updates. The updates are to make the functioning of your System better, but it might create a hindrance for your gaming task. To ensure fast gaming, you have to disable automatic updates for better Windows 10 gaming and to do that follow the given steps:
- First of all open Open Settings either from the start button or with Windows key + I
- Then Click Update and Security and select Windows Update
- There you have to search for Advanced options and after that click Update Options
- You have to disable auto-updates.
- Then Enable Show notification as it will hint you about every update your System is going to get
- And then you are done improving your gaming quality.
Disable Notifications in Windows 10 to avoid Gaming Hindrance
Many times you have turned on notifications so that you do not miss anything important. But these notification popping create a hindrance for your gaming.
You have to turn off pop-ups to enjoy better gaming. Follow the below steps to disable notifications in Windows 10:
- First of all open settings by searching it on the start button or hitting Windows + I
- Then click System and select Focus Assist
- Further, you have to Select Alarms Only as it will hide all other notifications except important alarms and reminders.
- And you are done disabling notification on your System which will promote faster gaming.
Prevent Steam Auto-Updating Games
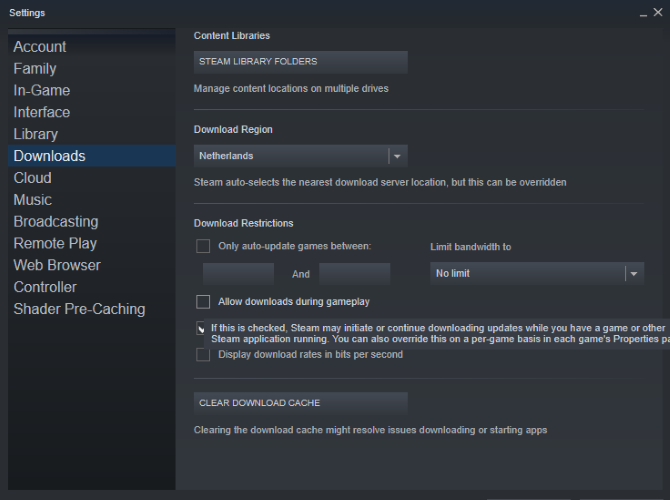
People who play games on windows generally install it from steam.many a time its auto-update feature might drink up all your internet and speed resulting in lower gaming. It is better to shut its update feature off and enjoy high gaming experience:
- Initially you have to launch the Steam client that will boost your gaming.
- Then open Steam and look for Settings. There open Downloads
- Lastly uncheck Allow downloads during gameplay
Windows 10 Visual Effects Needs to be altered
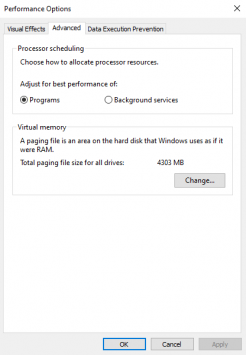
Graphical User Interfaces (GUI) of your System might be creating a hindrance to your gaming speed by affecting the processing speed.
Alter the settings of visual effects for better game improvements.
- First, you should open Settings with Windows key + I
- Then type “performance.”
- You should then select Adjust the appearance and performance of Windows.
- Then in the settings box, select Adjust for best performance
- Click on Apply
- Then click the Advanced tab
- Make sure that Adjust the best performance of his set to Programs
- Then click on Apply again, then OK to confirm
Alter Your Mouse Settings for better Windows 10 Gaming
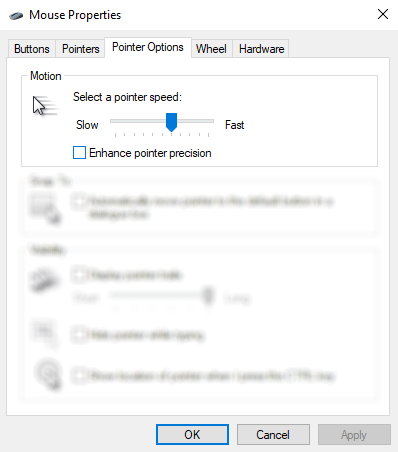
It might shock you, but a little tweak in your mouse settings can create a huge impact on the overall performance of your System. When it comes to PC gaming tweak your mouse settings to optimize your Windows 10 for gaming in a better way:
- Firstly, open Settings
- Then click Devices and then open Mouse
- Click on view to see the Pointer Options tab
- Then clear the Enhance pointer precision checkmark
- Then Click Apply
- Lastly, click OK to exit—you can also adjust the pointer speed to suit
Power Plan Enhances your gaming experience
Alter your power settings to find out its effect on your PC. You need to follow the following steps to maximize your power plan:
- First of all, you should open Settings
- Type in ‘power’.
- Then click Power & sleep settings and open Additional power settings
- Then select the high-performance option
- If it is not available, use the Create a power plan to configure a new, custom power plan
- This option allows your PC to perform better at the cost of higher energy consumption and temperature levels. For this reason, it is better to have an activated Windows 10 optimization on the desktop rather than laptop PCs.
Install DirectX 12 to Optimize for Gaming
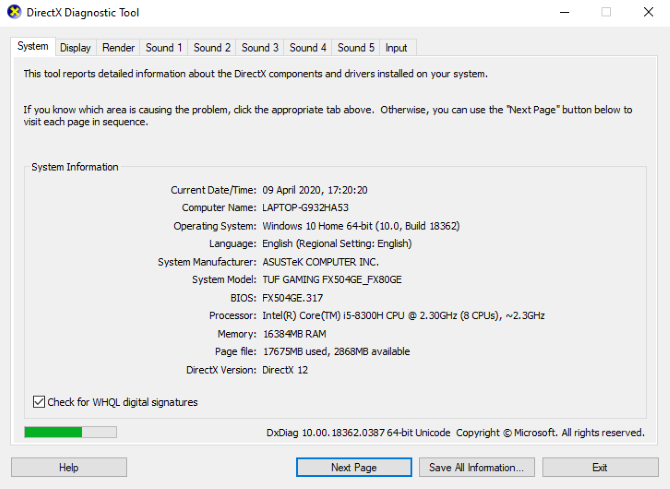
DirectX 12, is the food for faster online gaming. It enhances the support system of gaming that is CPU and GPU.
Follow the below steps To check if you have the latest version of DirectX:
- First, you should open Windows PowerShell
- Then type dxdiag
- After that tap Enter
- Soon, you will be able to see the DirectX Diagnostic Tool.
To fix the issue of non installed DirectX follow these steps:
- First, you should open Settings with Windows key + I
- Then select Update and security
- Open Windows Update and there you have to click on Check for updates
- Wait for the updates to install
- Many gaming settings will be automatically optimized by DirectX12 in Windows 10.
This is all you need to do to optimize faster gaming in your System. If we missed something, let us know in the comment box.